4:3 photos print to what size in inches?
For first-class webhosting that is reliable and affordable, we highly recommend: LiquidWeb
On this page ...
| On this folio I'll inform y'all about some common motion-picture show (photograph) formats. I'll likewise prove you how to get your pictures at the right size. Users of digital camera's are familiar with this problem: the digital pictures do non have the commonly used 4 x 6 inch (10 10 15 cm) size / aspect ratio. So prints done at a photo printing service seem to miss a piece of the picture. Users of APS photographic camera'due south will recognize some of these formats. For resizing nosotros really utilise the same trick every bit used in APS camera'due south! 2 formats are used in the earth of video: Idiot box (iv:three) and WideScreen (16:9). This concluding one is besides used for the HDTV format. Notation : We will discuss the dimensions of a film using the aspect ratio. So 4:three means that the motion picture has a width of four "units" and a height of 3 units. The "units" are not necessarily centimeters, inches or whatever. For example; a picture can be 12cm x 9cm. This is a four:3 ratio. Calculation case: Note : read the disclaimer! | |
Overview
In this article nosotros will talk over the commonly used ratios, nosotros'll likewise show you how to cut them in the proper size.
- 4:iii - Digital camera'due south, (S)VGA and Television set
- 3:2 - Classic Picture ratio
- 16:9 - Widescreen or HDTV format
- 3:1 - Panorama format
- How to cut pictures to the right size?
- Adobe Photoshop
- The GiMP
four:3 - Digital Camera'due south, (S)VGA and TV
One of the most ordinarily used aspect ratio is the 4:three format as seen with regular/older Television receiver's.
This format is very often used with digital camera's as well (nigh digital photographic camera's practise have a special setting and then it can also create 3:2 pictures: ten x 15 cm or 4 x 6 inch).
four:iii is also the aspect ratio of VGA formats (computer monitors).
The picture shown below is fabricated with my own digital photographic camera (Sony F828).
The original movie (downsized here) is 3264 x 2448 pixels (points).
Back to the adding example: both 3264 and 2448 can be divided by 816, resulting is a four:three attribute ratio.
For large numbers, I employ this trick to determine the aspect ratio:
Divide the tallest side by the smallest side (3264 / 2448). This will give us a fraction: 1,33333. This implies an attribute ratio of 1,3333:1. Since nosotros utilise integers to indicate aspect ratios, we need to multiple both numbers by 3. Later on all 1,33333 times 3 equals 4 (an integer). The other number in this attribute ratio is "1", multiply that past three and information technology will become you: 3. The aspect ratio of iv:3 shows.
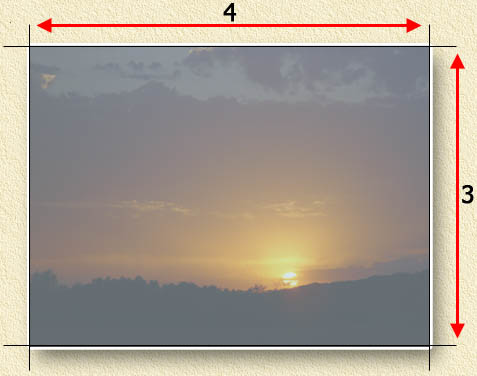
Classic TV, VGA, and Digital camera format: iv ten 3

Classic TV, VGA, and Digital camera format: example
3:2 - The classic photograph format
The archetype photograph format has a three:2 attribute ratio.
This is the common aspect ratio for photo prints: 15x10 cm or 6x4 inch.
The trouble with digital camera's is obvious; when getting a print, yous volition miss a little slice of the motion-picture show ...
Like mentioned before: virtually digital camera's accept a three:2 option, then pictures will actually be made in that aspect ratio.
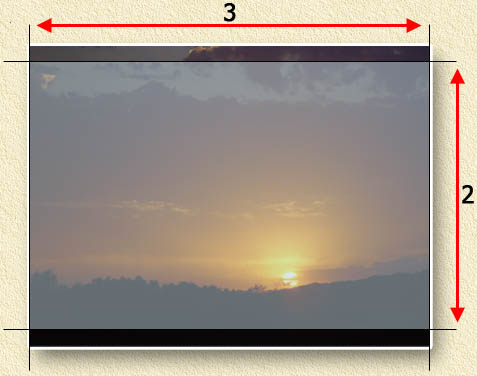
Classical Photo aspect ratio: iii:2

Classical Photograph attribute ratio: example
16:9 - WideScreen / HDTV format
This is the aspect ratio we run into with WideScreen (very common in Europe, less common in the US) and HDTV'due south.
APS camera's use this format as well - with ASP this is the maximum format.
More and more than laptops support this kind of aspect ratio. The purpose is obvious: watch widescreen movies on your laptop. Annotation that near laptops slightly divert from the 100% widescreen format. For case: my Compaq x1000 has a 1680x1024 resolution ... real xvi:nine would take been 1680 ten 945. Again; there is a proficient reason for this; it will allow extra infinite for the Windows taskbar and/or the DVD software control buttons.
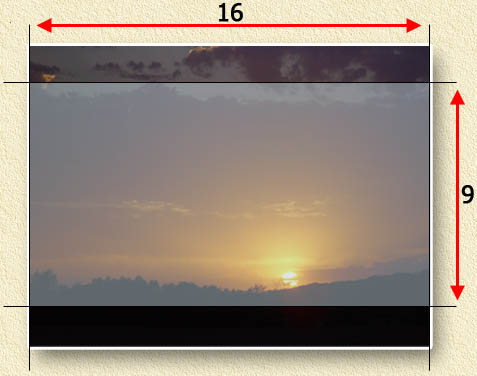
WideScreen: 16:ix
WideScreen: example
three:1 - Panorama Format
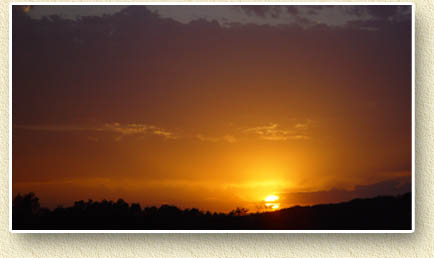
APS photographic camera's likewise know the and then called Panorama aspect ratio three:ane.
Many people think a panorama shot will have up more space on their ASP film, only that is not the case.
The magnetic strip on an APS film stores your setting for this picture (panorama) but makes a 16:9 picture anyway.
The equipment for handling ASP films volition (based on the info on the magnetic strip) automatically cut abroad to upper and lower part of the moving picture giving it the panorama wait.
We did the aforementioned thing with our example beneath. Well, OK, I moved the "selected" area a bit downwardly because that would effect in a nicer panorama picture.
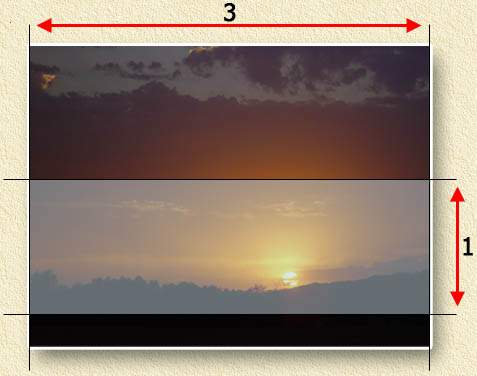
Panorama format: 3:1
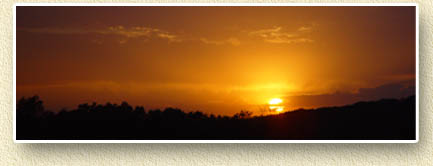
Panorama format: Instance
As you tin encounter in the case; the grapheme of the image becomes a whole lot unlike than the original picture.
How to conform size?
At that place is a shit-load of applications out there that tin can do this. I don't own them all, and then I'll focus on simply two.
Adobe Photoshop (the best graphical application around - but very expensive) and GiMP (a free Photoshop-await-a-like awarding).
Adobe PhotoShop
Where to get it: You lot can buy it (ameliorate see where you tin can go a loan for that) or (if y'all're lucky) it comes every bit a Lite version or a Special Edition version with your scanner or digital photographic camera.
Note : Special versions (SE, Lite, etc) might have limitations apropos the trick we show below!
Step i: Load the picture into Photoshop (Oh right, the examples are based on version 8/CS, older version volition almost probable have these options likewise).
Step 2: Select a random foursquare/rectangle using the "rectangular marquee tool" - which you can actuate by pressing the fundamental "M".
Adobe Photoshop - The Rectangular marquee tool
Step three: From the menu "Select", choose "Transform Option".
Step 4: Drag the selection into the aspect ratio you want to accept.
The "Info" window (Press F8 acme reveal it if hidden) will help you with that.
Adobe Photoshop - Select the area you like and alter the aspect ratio of the selection
Adobe Photoshop - Info window (F8): Read the attribute ratio values here
W (width) and H (superlative) indicate the selection size in pixels: 400 x 133 in this example. This is really a 3:one ratio.
Step 5: Copy, create new file, and paste:
Press the keys CTRL+C (=Copy), then CTRL+N (= carte "File" - "New"), press ENTER and press the keys CTRL+V (=Paste).
Stride 6: Save the file as JPEG/JPG (usual file format for pictures). Select "File" - "Save As". Set up "Format" to "JPEG", type a name and click "OK".
Photoshop at present prove a window where you tin can set the quality. GiMP has a scrap more to offer here, but information technology volition exercise.
Move the "Quality" slider ("small file" on the left and "large file" on the right) which changes the epitome quality.
Naturally: the college the quality, the larger the file.
Optionally you tin can check "Preview" and so you get an idea what it'due south doing to your motion picture.
Make a selection and click "OK".
GiMP
Where to et information technology: GiMP is free and can be downloaded for Linux, Apple Macintosh OS X and Windows from the GiMP website. Here I used GiMP two.0.3.
Note : Before you can install GiMP on a Windows PC, i MUST install GTK first. All files tin can be found on this website.
GiMP works slightly different than other graphical application, and then you might demand a bit of do to get used to is. To me it'south a bit of a weird collection of individual windows.... but that's just me.
Stride 1: Load the picture into GiMP.
Tip : In the window chosen "The GIMP" y'all select "File" - "Open" and select the file you want to work with. Unfortunately (and a bit foreign to me) the dialog is nothing like what you've been used to from Windows. On the left y'all will find directories, and drive messages, in the middle you see the file names of the selected directory, and on the right y'all volition see a preview in case you selected a file.
Step 2: Set the desired aspect ratio.
A very nice characteristic of GiMP - you can fix a selection to a sure aspect ratio:
GiMP - Attribute Ratio Fixed
Become to the tools window, the window with the name "The GIMP".
Check the option "Machine Shrink Selection", and set "Fixed Attribute Ratio". Next enter the desired aspect ratio: width and summit. In our instance we wanted a three:i movie (panorama), so enter these values.
Step iii : Select a rectangle using the "Select rectangular regions" tool - y'all can activate this tool by pressing the "R" key subsequently you lot have activate the window of the flick.
The best position to start a selection is past looking which part of the moving picture is the well-nigh important i. Get-go on the border of the image.
For case: In our picture, nosotros would like to come across a bit of the ground. So nosotros start in the lower left corner dragging to the upper right corner (practise NOT go across the border of the prototype, as this will spiral up the aspect ratio!).
Step iv : Copy, create new file, paste:
Again nosotros run into that GiMP has some fun ideas implemented: From the bill of fare "Edit" choose "Past as new". GiMP will automatically copy the pick, create a new file and paste the selection correct in there.
GiMP - Past as New - pretty easy
Step 6: Salve the file equally a JPEG/JPG (common flick file format). Use the bill of fare of the picture and select "File" - "Salvage Equally". On the right, from the "Determine File type" menu, choose "JPEG", blazon a name and click "OK".
GiMP will now vino that it has issues because the layers are not supported by the JPEG format. Just ignore it and click the "Export" button .
GiMP - Export alarm - Just click the "Export" button
Again some other window appears assuasive you to set the quality of the picture.
Optionally you lot can cheque the "Preview" option which opens a window showing yous correct abroad what impact your quality selection has on the epitome.
The "Quality" slider is used to increment/decrease the quality.
Again: higher quality means larger file.
Tip : GiMP allows you add together comments to the file in the lower input field. Practical if you lot desire to write something down like where and when the moving picture was taken.
Click "OK" and your picture will be saved.
Source: https://www.weethet.nl/english/photo_sizes.php
0 Response to "4:3 photos print to what size in inches?"
Post a Comment